Multilayer Mandala: Creative Laser Cut Design
Digital fabrication has transformed how we approach intricate art, turning complex geometric patterns into accessible projects for makers of all skill levels. At the heart of this movement is the Multilayer Mandala, a design concept that merges traditional spiritual symbolism with modern cutting technology. Unlike flat decals or single-layer engravings, a multilayer approach adds depth, shadow, and tactile dimension to the artwork. This specific design, often referred to as Multilayer Mandala 1, serves as an excellent entry point for those looking to explore the intersection of digital precision and handcrafted assembly.
Whether you are a hobbyist looking for a weekend project or a small business owner seeking scalable products, understanding the nuances of layered laser-cut designs is essential. The appeal lies not just in the final aesthetic, but in the versatility of the process. By utilizing files prepared for CNC routers, laser cutters, and other digital machines, creators can produce consistent, high-quality results without needing to draft complex vector paths from scratch.
Understanding the Multilayer Concept
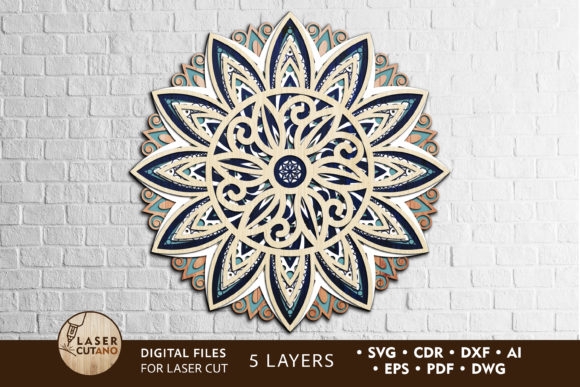
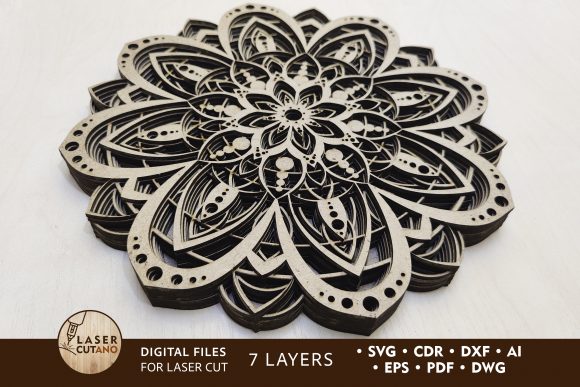
A multilayer mandala is constructed by stacking several distinct sheets of material, each cut with specific patterns that align to create a cohesive three-dimensional image. For Multilayer Mandala 1, the design features seven distinct layers. When assembled, these layers create a sense of depth that changes depending on the viewing angle and lighting conditions. This technique mimics the look of carved wood or stone but achieves it through subtractive manufacturing and assembly.
The technical preparation for such a project is critical. The files provided for this design come in a comprehensive .zip folder containing formats like .AI, .SVG, .DXF, .DWG, .CDR, .EPS, and .PDF. This wide range of compatibility ensures that whether you use Adobe Illustrator, CorelDRAW, AutoCAD, or basic laser software, you can import the design without conversion errors. It is important to remember to unzip the folder before attempting to use any of the files, a small step that often trips up beginners unfamiliar with digital asset management.
Tailoring the Project to Your Skill Level
The beauty of pre-made digital templates is their adaptability to different user experiences. However, how you approach the Multilayer Mandala will vary significantly based on your background and goals.
For Beginners and Hobbyists
If you are new to laser cutting or CNC routing, this project offers a structured learning experience. The primary challenge here is not design, but execution and assembly. Beginners should focus on material selection and machine settings. The recommended material thickness ranges from 3 mm to 6 mm (approximately 1/8 inch to 1/4 inch). Starting with cardboard or thick paper can be a cost-effective way to test the fit of the layers before committing to expensive woods or acrylics.
For this audience, the priority is ease of use and learning value. The seven-layer structure teaches patience and precision in gluing. A practical tip for novices is to dry-fit all layers before applying any adhesive. This helps identify any tight spots or misalignments caused by kerf width—the amount of material burned away by the laser—which can vary between machines.
For Professionals and Creators
Experienced makers and professional designers view the Multilayer Mandala as a canvas for customization. While the base geometry is provided, the creative potential lies in material contrast and finish. Professionals might mix materials, using opaque acrylic for the base layers and translucent Plexiglas for the top layers to create lighting effects. Alternatively, combining wood veneers with metal accents can elevate the piece from a craft project to a high-end decor item.
For this group, flexibility and quality are paramount. The ability to scale the design is a significant advantage. While the standard finished product size is 12x12 inches, professionals can increase the dimensions to create large wall installations. However, caution is advised when reducing the size. Thin elements within the mandala pattern may become too fragile if scaled down too aggressively, potentially breaking during the weeding or assembly process.
For Educators and Students
In an educational setting, this project serves as a multidisciplinary tool. It combines mathematics (geometry and symmetry), art (composition and color theory), and engineering (material properties and assembly techniques). Teachers can use the Multilayer Mandala to demonstrate how digital files translate into physical objects. The step-by-step nature of layering allows students to see immediate progress, keeping engagement high.
Educators should prioritize reliability and safety. Using softer materials like foam board or thick cardstock can reduce the risks associated with powerful laser cutters while still demonstrating the layering concept. The clear file formats ensure that students can learn industry-standard software workflows, preparing them for future technical careers.
Material Selection and Preparation
The choice of material dramatically influences the final outcome of your mandala. The design supports a wide variety of substrates, including plywood, MDF, acrylic, Plexiglas, metal, cardboard, and paper. Each material brings unique characteristics to the project.
- Plywood and MDF: These are the most common choices for a warm, organic look. They are easy to cut and glue, making them ideal for home decor. Ensure you use high-quality plywood with minimal voids to prevent breakage in intricate areas.
- Acrylic and Plexiglas: These materials offer a modern, sleek aesthetic. They are perfect for creating light-catching pieces. However, they require careful handling to avoid scratches, and the glue must be specifically designed for plastics to ensure a strong bond without fogging the clear surfaces.
- Metal: For industrial-chic designs, metal sheets can be used. This typically requires a CNC router or plasma cutter rather than a standard CO2 laser. Metal layers add significant weight and durability, suitable for outdoor or high-traffic installations.
- Cardboard and Paper: Excellent for prototyping or lightweight decorative items. These materials are forgiving and inexpensive, allowing for rapid iteration of design ideas.
Regardless of the material, preparation is key. The instructions explicitly state to paint before gluing. Trying to paint a fully assembled, multi-layered object is nearly impossible due to the deep recesses and tight spaces between layers. Spray painting individual sheets before assembly ensures even coverage and a professional finish. This step also allows for creative color blocking, where different layers are painted in contrasting or gradient shades to enhance the 3D effect.
Commercial and Practical Applications
For entrepreneurs and small business owners, the Multilayer Mandala represents a viable product line. The digital nature of the files means low overhead costs; once purchased, the design can be reproduced infinitely. The perceived value of a hand-assembled, seven-layer wooden art piece is significantly higher than a flat printed image, allowing for better profit margins.
When evaluating this for commercial use, consider speed and consistency. The standardized file formats ensure that every unit produced looks identical, which is crucial for brand reliability. Additionally, the ability to offer customization—such as choosing specific wood stains or acrylic colors—can be a unique selling proposition. Business owners should also consider the packaging implications, as layered items can be delicate during shipping. Proper padding and disassembly options (if applicable) might need to be explored for larger sizes.
Maximizing the Design Potential
To get the most out of the Multilayer Mandala 1 files, keep the following practical considerations in mind:
- Check Your Kerf: Every laser cutter removes a slightly different amount of material. Perform test cuts on your chosen material to ensure the tabs and slots (if present) or alignment markers fit snugly.
- Layer Order: Keep the layers organized as you cut them. Labeling the back of each sheet with a pencil can prevent confusion during assembly, especially if you are working with similar-looking materials.
- Adhesive Choice: Use a clear-drying glue for acrylics to maintain transparency. For wood, wood glue or cyanoacrylate (super glue) works well, depending on the desired drying time and bond strength.
- Scaling Wisely: If you choose to increase the size beyond 12x12 inches, ensure your machine bed is large enough. If reducing the size, inspect the smallest details in the preview to ensure they won't burn away or break off.
In conclusion, the Multilayer Mandala is more than just a digital file; it is a versatile tool for creative expression. Whether you are drawn to the meditative process of assembly, the technical challenge of precise cutting, or the commercial potential of unique home decor, this design accommodates a wide range of intentions. By understanding the materials, respecting the limitations of scaling, and preparing your workspace effectively, you can transform these digital vectors into tangible, breathtaking art.